An innovative plywood slab-on-grade means less time, money, and carbon
By Josh Salinger – Fine Homebuilding Issue 305 – Feb/March 2022
As the costs of concrete and excavation have increased steadily in the Pacific Northwest, where my company designs and builds, local builders are more frequently turning to slab-on-grade foundations. These assemblies require less concrete and labor than full basements and have a number of advantages over crawlspaces: better thermal performance, much lower risk for water and animal intrusion, and lower maintenance overall. Slab-on grade foundations also make universal design easier to achieve. In our ongoing quest to improve residential construction methods, we’ve embraced a number of new approaches to slab-on grade foundations, developing team expertise with each new one we design and build. One of those approaches is the concrete-free slab.
While we did not invent the concept, we have tried to refine our approach with every new concrete-free slab we install by improving both efficiency and effectiveness. We are so comfortable now with plywood slabs that we’ve committed to using them in all our future slab-on grade foundations. We recently designed and built two almost identical, 800-sq.-ft. accessory dwelling units (ADUs), each with a 665-sq.-ft. slab-on grade. Both are aiming for zero-energy-ready certification, with owners who are trying to reduce the buildings’ environmental footprints. These projects proved to be perfect for a concrete-free slab.
| WHY WE DITCHED THE CONCRETE REDUCED EMBODIED CARBON Concrete has a high amount of embodied carbon, and companies like ours that specialize in high-performance, environmentally conscious construction are always looking for innovative ways to use less of it. Roughly 40% of all greenhouse-gas (GHG) emissions in the United States come from our buildings, 11% of which comes from the carbon embodied in the materials used to make those buildings. Concrete is one of the biggest single contributors to GHG emissions, responsible for 8% of total emissions on the planet. So it makes sense to reduce not only the amount of energy used in operating our buildings but also the amount of concrete we use to build them. FEWER DELAYS AND MOISTURE REDUCTION A plywood slab is not only more environmentally sound than the full concrete approach, but it offers a number of practical benefits too. Our carpenters can build the slab themselves, saving on costs and allowing us to better control the timeline, avoiding delays due to subcontractor schedules and more. We can also start exterior and other load-bearing framing as soon as the stem walls cure, without waiting for the slab to be poured and waiting again for it to cure. Plus, unlike concrete, the plywood slab does not load significant moisture into the building envelope during the curing process. HASSLE-FREE FLOORING Another big advantage of a plywood slab is that finished flooring can be installed directly onto it—no different than installing flooring on a plywood-and-joist floor. We used a floating, engineered cork floor in the accessory dwelling units featured in this article, and we’re planning a nailed-down, tongue-and-groove (T&G) hardwood floor on a future plywood slab. To install flooring on a concrete slab, on the other hand, a vapor barrier must be applied over the top with additional accommodations—such as wood sleepers and a plywood subfloor—depending on the flooring chosen. To make the plywood slab as durable as possible, we choose a vapor-permeable flooring for the largest areas of the slab. This allows any incidental moisture—from spills, toilet overflows, or whatever else happens above the floor—to dry to the interior and not build up in the plywood. That said, we feel comfortable using impermeable flooring such as tile in smaller areas (kitchens and baths, for example) as long as it’s installed over a decoupling membrane to allow the slab to flex and move below it and as long as there are adjacent permeable areas for the plywood to dry to. Bottom line: The plywood won’t degrade as long as it has more of an opportunity to dry than it has potential for retaining moisture. |
Start off on the right footing
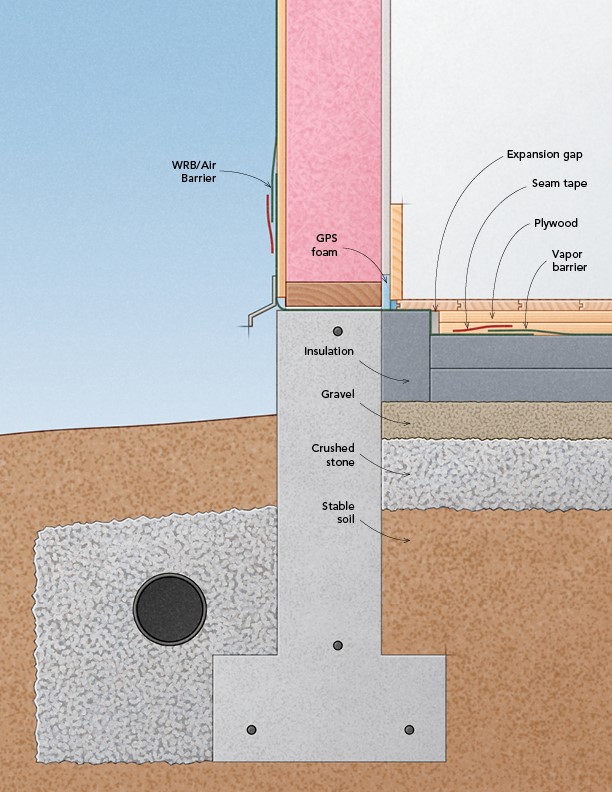
Building codes in our climate zone (4C) require a minimum R-15 thermal break at the edge of a concrete slab, where up to 60% of heat loss occurs. Compared to concrete, however, a plywood slab-on-grade has very little thermal loss at the edges because it’s only 1-1⁄2 in. thick, and it’s made of wood. One could reasonably argue that the standard level of slab-edge insulation isn’t as necessary with a plywood slab-on grade. However, making this argument to your local building inspector might not be worth the headache; the code has no guidance on anything other than concrete slabs.
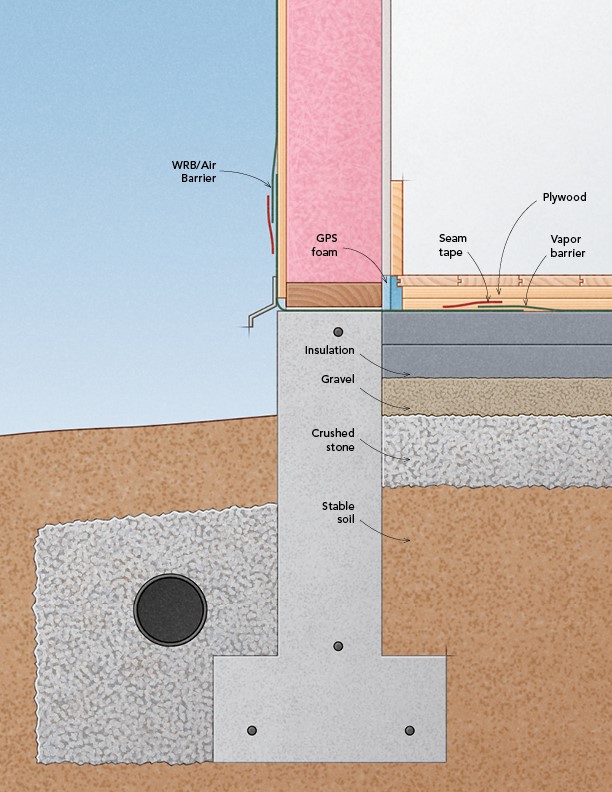
We use a stem wall made from insulated concrete forms (ICFs). Made of reinforced foamboard that stays in place after the pour, ICFs (ours are made by BuildBlock Building Systems) provide a two-sided thermal break that creates a very high-performing slab-on grade and surpasses code requirements. A typical R-15 slab-edge thermal break translates to roughly 3 in. of GPS or XPS foam. Here are two additional options if you’d rather not use ICFs for a concrete-free slab.
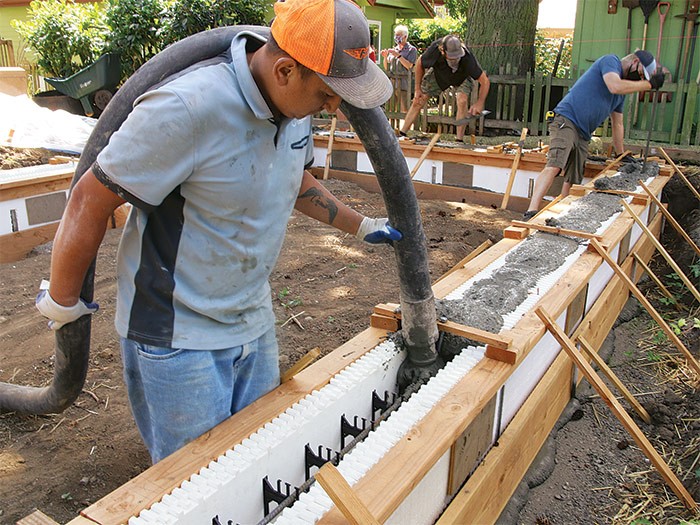
FRAME THE FOOTINGS AND SET UP THE STEM-WALL FORMS: Footings are framed with 2x12s, and the sides are reinforced to keep them from bulging under load. The ICF forms are fitted with rebar and stay in place after the pour. Most of the lumber is reused for framing.
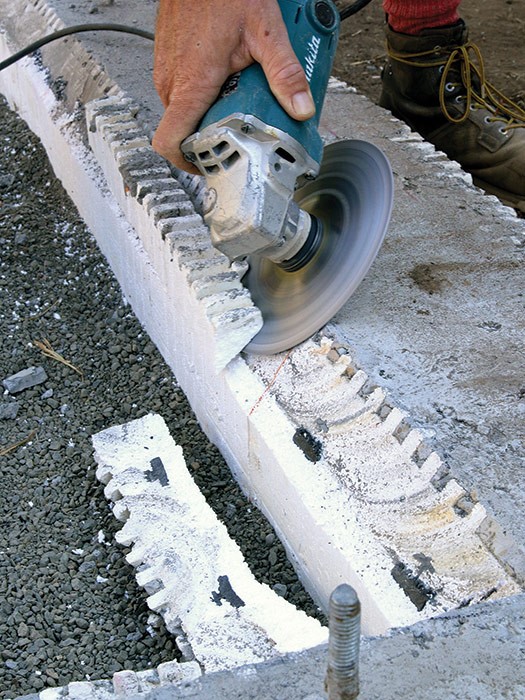
One thing to consider is that the foam, located where the slab and stem wall connect, can make it difficult to fasten hardwood flooring or carpet at the edges. With the ICFs we ordered for this project, each foam layer is only 2-1⁄2 in. thick, making the problem area a bit thinner to start with. To erase the problem almost entirely, we bevel the interior side of the ICF at 45°, allowing us to run the plywood slab very close to the wall while still meeting code.
We also like ICFs because we don’t have to own and store concrete forms and the associated materials, nor rely on outside foundation subs. Instead, we can form and pour foundations on our own schedule, using our own crew, which has become quite adept with these systems. In addition, ICFs are small, lightweight, and portable, making them especially useful for smaller structures with limited access, such as the accessory dwelling units (ADUs) we build in Portland’s dense historical neighborhoods.
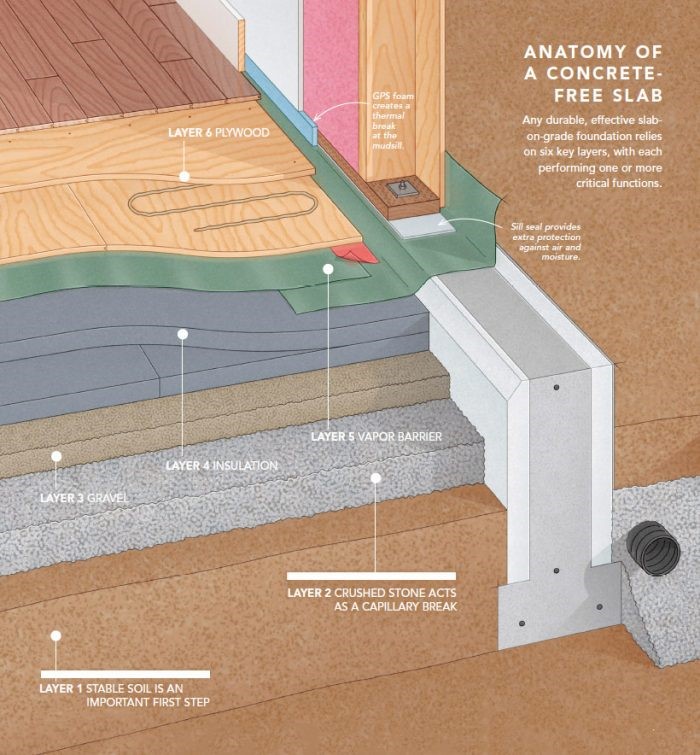
LAYER 1: STABLE SOIL IS AN IMPORTANT FIRST STEP: The first layer is the native, undisturbed soil or engineered fill that the slab, its footings, and ultimately the building bear on. Since we designed the building featured here to have no interior point loads, all the bearing is on the perimeter stem wall and footings, and the slab has no structural function. When we have a building with point loads or load-bearing walls on the interior, we add interior footings, just as we would with a concrete slab.
LAYER 2: CRUSHED STONE ACTS AS A CAPILLARY BREAK The second layer consists of a minimum of 4 in. of compacted, 3⁄4-in. crushed stone with no fines. Its primary function is to act as a capillary break, preventing moisture from being wicked up through the slab and into the building. This second layer also functions as a “pressure field extender” for the soil-gas ventilation system, with perforated pipes either passively or actively keeping radon from entering the home, depending on local requirements.
Drawing: Peter Wojcieszek
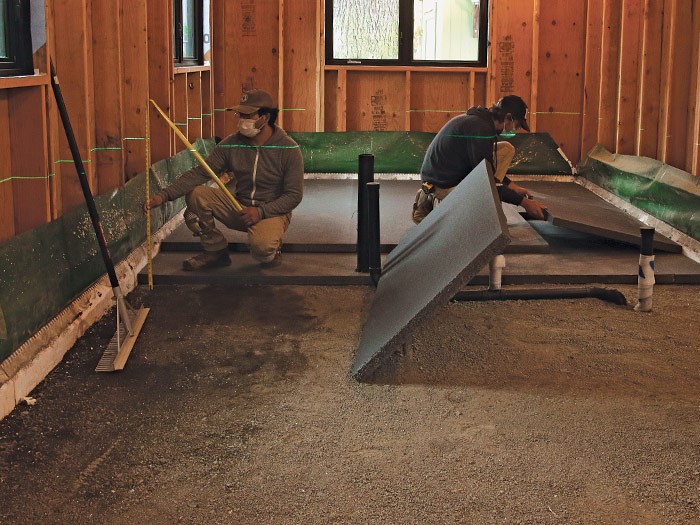
LAYER 3: Gravel keeps things level under the concrete-free slab
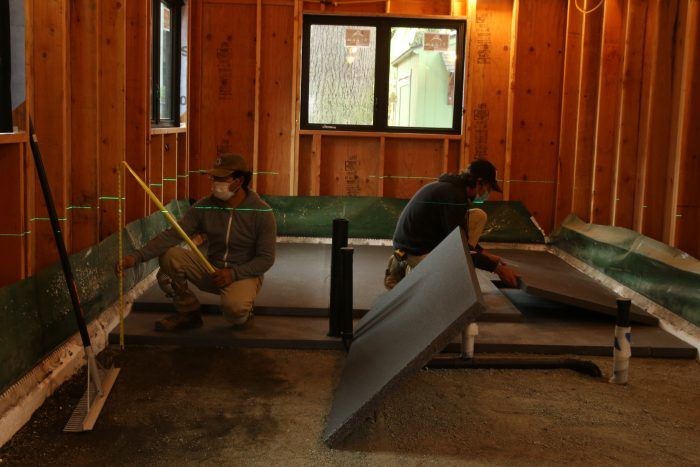
On a concrete-free slab-on grade, we add a 2-in. to 3-in. layer of 1⁄4-in.-minus gravel above the capillary-break stone. This layer is much easier to screed level and flat so that we can then set our foam-insulation layers in full contact without any voids or settling, which could create bouncy or uneven floors. We set a laser line on the wall for reference and use a grading rake to get the gravel close to level; we check it with a tape measure. After that we use a 2×4 as a screed, working it back and forth to set the grade perfectly flat, 6-1⁄4 in. below the stem wall.
GRADE THE GRAVEL: The top layer of 1⁄4-in.-minus gravel is easier to rake and screed level than the 3⁄4-in. crushed stone below. Note the connecting strip of vapor barrier, which is tacked up onto the wall for now.
Since the grade of each ADU was high enough relative to the plumbing hookups at the main house, we were able to run the water supply and sewer connections below the footing. After framing we invited our plumber in to trench the gravel and install the radon, supply, and drain lines from their connection points under the footing to their interior stub-outs. As he dug, we were sure to keep the 3⁄4-in. stone in separate piles from the 1⁄4-in. gravel. We also made sure the plumber set the horizontal runs lower than the grade of the gravel so we wouldn’t have to carve out the foam around the pipes.
LAYER 4: Rigid foam eliminates cold feet
We run rigid insulation horizontally under the entire slab, just as we did before we switched from concrete to plywood. It’s not very costly to do in comparison to the usual approaches, and the benefits to the homeowner are significant. The first is comfort. People don’t want to feel cold underfoot, and they tend to complain if they do—something every builder wants to avoid. A full layer of insulation under the slab mitigates this problem significantly. Just as importantly, there is a big benefit in energy efficiency. For the floating plywood slab, this continuous insulation layer is essential, providing a flat, stable surface for the floating raft of T&G plywood. We use two layers of 2-in.-thick graphite polystyrene (GPS) foamboard, oriented perpendicular to one another with the seams offset to ensure minimal air gaps.

LAY DOWN TWO LAYERS OF GPS: We measure down from a laser line as we grade the gravel and lay down two overlapping layers of 2-in. GPS foam insulation, each laid perpendicular to the other and with alternating seams.
LAYER 5: 10-mil poly blocks moisture migration through the concrete-free slab
The fifth layer—above the insulation and directly below the slab itself, is a polyethylene sheet that acts as a Class 1 vapor barrier. The vapor barrier isolates the concrete-free slab from the ground and the water and vapor it contains. Regardless of climate, the relative humidity of the ground always approaches 100%. If this layer were omitted, the concrete or plywood would draw moisture into the building, inviting rot, mold, and humidity issues.
The 10-mil polyethylene sheet we use—W.R. Meadows SealTight Perminator— is a big reason we feel the concrete-free slab is a durable, long-term approach. It’s critical to use compatible tapes for sealing the seams and to ensure complete adhesion. Any penetrations, such as plumbing or radon vents, must be taped completely from pipe to poly without gaps, folds, or other sloppy work.
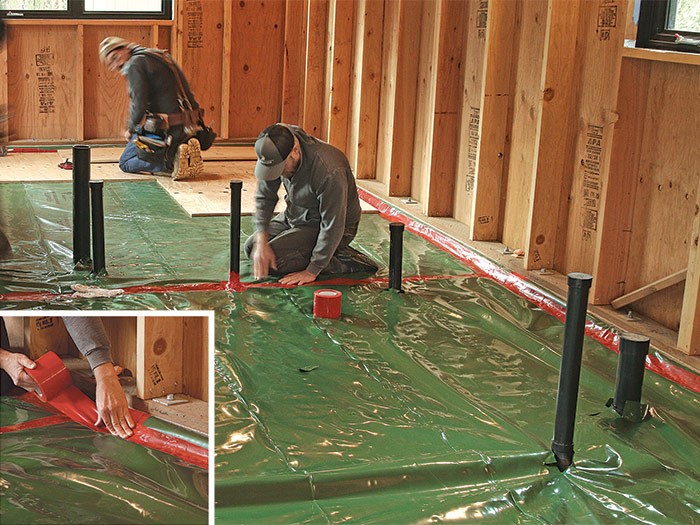
In our approach to the foundation-and-wall connection, this layer also doubles as the air barrier. Although there are other perfectly great ways to detail an air barrier from the sheathing to the stem wall, we run ours below the mudsill. This is not only effective, but it’s also efficient for our crew. The connection is as simple as draping a 20-in.-wide strip of poly over the stem walls prior to installing the mudsill. We add a strip of sill seal on top to help take out some of the inconsistencies in the stem wall and to act as a secondary capillary break.
The wide strip of vapor barrier is tacked up temporarily on the inside walls to keep it out of the way. Once the insulation layer is installed, we simply roll out the vapor barrier in the field and then tape down the flap at the perimeter to complete a continuous vapor and air seal. On the exterior, the overlap is brought up over the sheathing and tacked in place. In order to create a continuous air barrier and avoid potential water damage, it’s important to lap over and seal the vapor barrier with a self-adhered or liquid-applied membrane rather than a mechanically applied WRB. Our self-adhered water-resistive-barrier membrane gets lapped over it and sealed to create a continuous air barrier.
TAPE SEAMS AND PENETRATIONS: We fill gaps around plumbing penetrations with canned spray foam, and we tape those areas carefully. We also tape to the connecting strip of poly that was installed earlier under the sill plate.
LAYER 6: Two layers of plywood is the last step to finish the concrete-free slab before interior walls go up
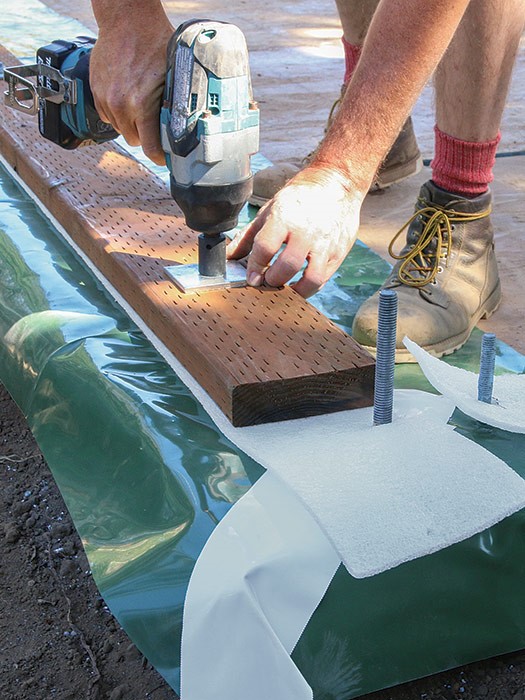
The sixth and final layer, resting on the vapor barrier, is the material that creates the concrete-free slab. This is the strong surface layer that takes the place of traditional rebar and concrete. The plywood is standard 3⁄4-in. T&G CDX subfloor material. Pressure-treated plywood is not only unnecessary but would add chemicals and VOCs to the interior environment. We install two layers, with the second set perpendicular to the first and the joints offset.
We had the opportunity to test the performance of both T&G and regular plywood in two identical buildings. We found that the T&G floor was more robust but took more effort to install. Moving forward, we will be using T&G, but you can use the approach that works best for your situation.
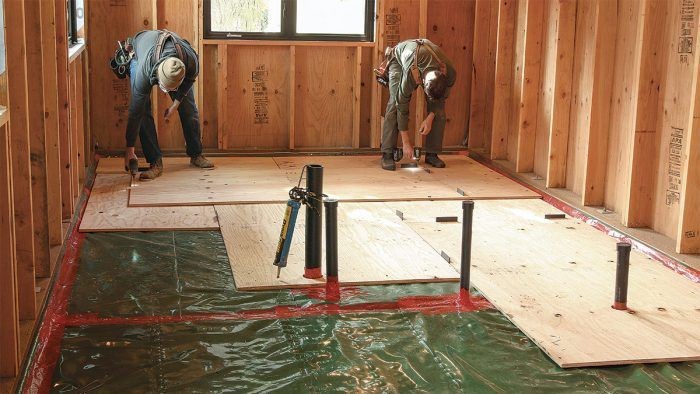
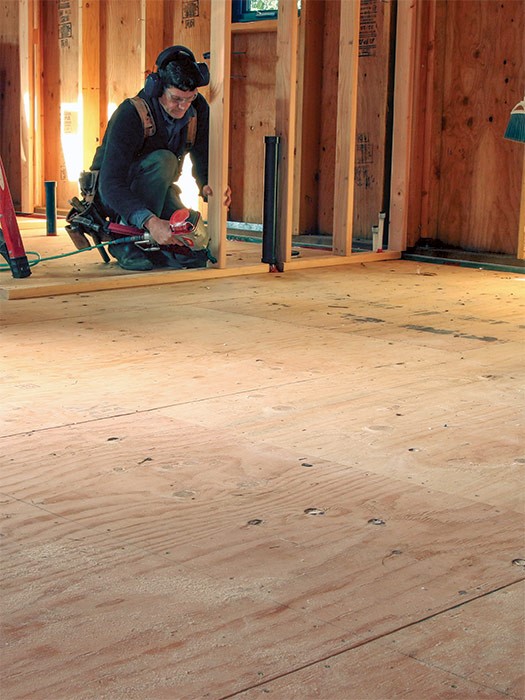
For the first layer, we leave a 1⁄2-in. gap between the outside edges and the stem wall to allow the T&G plywood to expand and contract. To maintain that gap as the edges are connected, we install temporary braces between the first row and the framing. The top layer can overhang the bottom layer slightly, because the edges of the ICFs were cut back earlier. The two layers are allowed to float on the layers below and are joined together with construction adhesive and 1-1⁄4-in. screws, sized so they don’t penetrate the vapor barrier below.
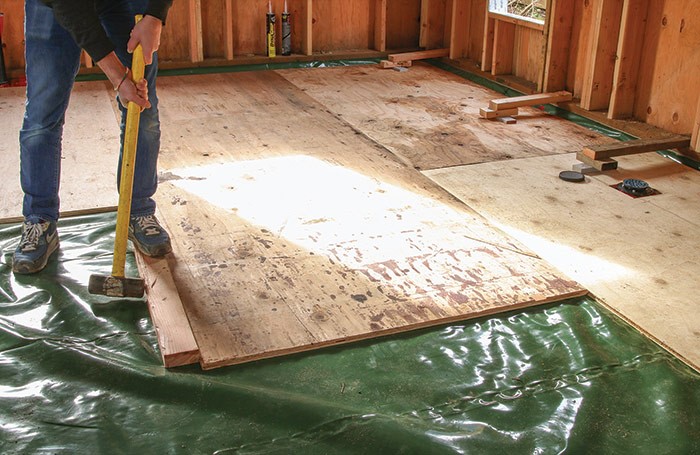
PROTECT THE VAPOR BARRIER: We create stops out of 2×4 scraps to prevent the plywood from moving and potentially damaging or pinching the vapor barrier, or shifting the insulation layers below, as we smack the consecutive sheets of T&G plywood together.

GLUE AND SCREW: Maintain a 1⁄2-in. space around the perimeter with blocks before fastening the plywood with glue and screws. With the second plywood layer in place, the slab is ready for interior wall framing and flooring installation.
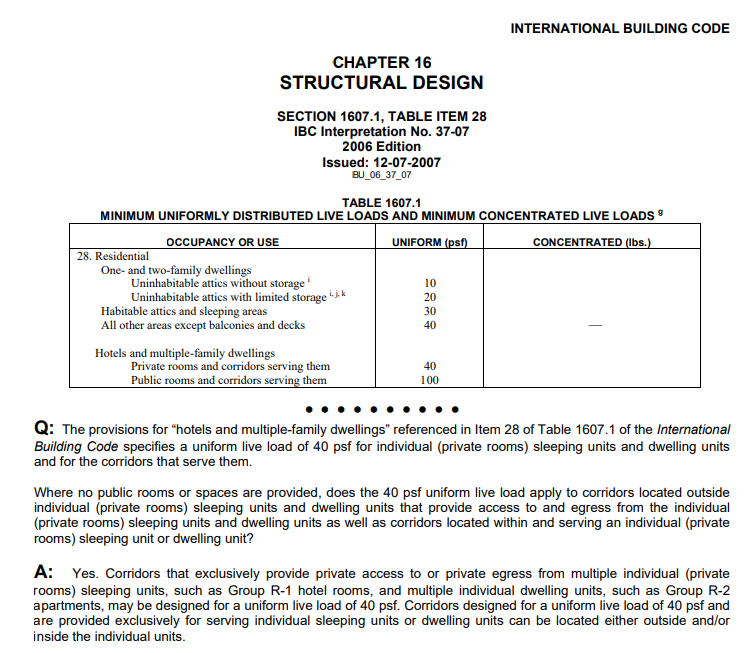
IBC Flooring
IBC 406.2.4 requires garage floors to be concrete or similar approved noncombustible and nonabsorbent materials. IRC R309.1 is similar.
IBC Table 1607.1 requires garage floors to be designed for the uniformly distributed live loads of this table or the following concentrated loads: (1) for garages restricted to passenger vehicles accommodating not more than nine passengers, 3,000 pounds acting on an area of 41/2 inches by 41/2 inches …
If this is an accessory to a residence, the IRC has similar requirements in R309.1 & Table R301.5.
IRC 2021: Section R502
Engineered rim board shall conform to ANSI/APA PRR 410 or evaluated in accordance with ASTM D7672
Draftstopping in accordance with R302.12
Firestopping in accordance with R302.11
Particleboard underlayment minimum thickness of 6.4mm
Minimum 100mm granular base of gravel (Max size 19.1mm or crushed stone with a maximum size of 12.7mm. Damp proof membrane of 0.15mm, joints lapped 150mm and taped.
https://cdn-codes-pdf.iccsafe.org/content/IRC2021P2/chapter-5-floors
Foundation Insulation Options for a Concrete-Free Slab
A plywood slab-on-grade requires a similar foundation construction to the ones used when building a traditional concrete slab-on-grade home.
By Josh Salinger Issue 305 – Feb/March 2022
There are several benefits to building a concrete-free, slab-on-grade home, including a reduction in embodied carbon, less flooring headaches, and faster completion times. When choosing to build a home with a plywood slab, the foundation construction and insulation options are similar to the ones used when building a traditional concrete slab-on-grade home. At Birdsmouth Design Build, we build our foundations using insulated concrete forms (ICF), but if you would rather not use ICFs, here are two additional options.
#1 Raise the insulation layer
If you’re okay with a step up into the home, you can simply raise the level of the horizontal insulation to be flush with the top of the stem wall (we also place a thin thermal break between the flooring and sill plate). This approach far and away exceeds minimum code requirements, but you’ll need to create a landing at the exterior door to avoid a short awkward step, and be sure to flash the threshold carefully to prevent water entry.
#2 Place a vertical foam layer inside the stem wall
To bring the finished flooring down level with the threshold (in keeping with universal design) while creating the code-required thermal break at the edge of the slab, extend the continuous layer of foam under the slab into an L-shape at the edges. The downside here is a slightly larger space between the plywood slab and the flooring, making it difficult to attach flooring at the perimeter.
If you would like to learn more about the benefits of a concrete-free slab, or if you would like to see the detailed step-by-step process that will demonstrate exactly how to build one, check out the full story here.
Josh Salinger is founder and CEO of Birdsmouth Design Build, a residential design-build firm in Portland, Ore. Photo by Asa Christiana. Drawings by Peter Wojcieszek.
https://support.tekla.com/help/tekla-structures/2021/kingspan-m33
https://support.tekla.com/help/tekla-structures/2021/kingspan-m33partstab
https://support.tekla.com/help/tekla-structures/2021/kingspan-m33parameterstab
Door openings between a private garage and the dwelling unit shall be equipped with solid wood doors
not less than 13/8 inches (34.9 mm) thick, or doors in compliance with Section 715.4.3. Openings from a
private garage directly into a room used for sleeping purposes shall not be permitted. Doors shall be
self-closing and self-latching.
Concentrated loads. Floors and other similar surfaces shall be designed to support the uniformly distributed live loads prescribed in Section 1607.3 or the concentrated load, in pounds (kilonewtons), given in Table 1607.1, whichever produces the greater load effects. Unless otherwise specified, the indicated concentration shall be assumed to be uniformly distributed over an area 2.5 feet by 2.5 feet [6.25 square feet (0.58 m2)] and shall be located so as to produce the maximum load effects in the structural members.
Passenger vehicle garages. The live loads shall not be reduced in passenger vehicle garages except
the live loads for members supporting two or more floors are permitted to be reduced by a maximum of 20 percent, but the live load shall not be less than L as calculated in Section 1607.9.1.
The area of floor used for parking of automobiles or other vehicles shall be sloped to facilitate the movement of liquids to a drain or toward the main vehicle entry doorway.
Ducts in a private garage and ducts penetrating the walls or ceilings separating the dwelling unit from the
garage shall be constructed of a minimum 0.019-inch (0.48 mm) sheet steel and shall have no openings into
the garage.
Parking surfaces shall be of concrete or similar noncombustible and nonabsorbent materials.
IBC 406.2.4 requires garage floors to be concrete or similar approved noncombustible and nonabsorbent materials. IRC R309.1 is similar.
IBC Table 1607.1 requires garage floors to be designed for the uniformly distributed live loads of this table or the following concentrated loads: (1) for garages restricted to passenger vehicles accommodating not more than nine passengers, 3,000 pounds acting on an area of 41/2 inches by 41/2 inches …
If this is an accessory to a residence, the IRC has similar requirements in R309.1 & Table R301.5.
A handy sheet of 3.2mm Hardox 450. Hardox 450 is the most popular abrasion-resistant steel with excellent structural properties and nominal hardness of 450 HBW. Hardox 450 can be used in many different components and structures that are subject to wear.
A handy sheet of 3mm Strenx 700 MC Plus. Strenx 700MC Plus is a high-strength structural steel with advanced cold formability and impact toughness for highly demanding applications. It is typically used in applications that require superior bendability, high impact toughness in cold conditions and the ability to cut mechanically.
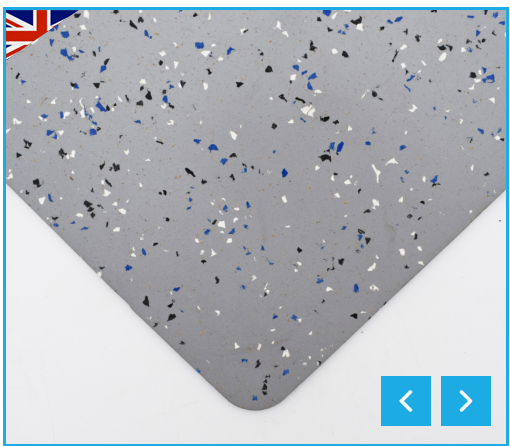
FIRE RESISTANT FLOORING
ITEM CODE: RC04FSF
KEY FEATURES
- High quality product
- Complies with BS6853, DIN 5510, NFF 16-101 & ASTM standards
- Good oil & grease resistance
- Resilient & comfortable
- Easy to install
- Easy maintenance
- Highly versatile
- Excellent anti slip properties
- High durability
- Hygienic & non-porous
- IMO Standards

PRODUCT DESCRIPTION
Our fire resistant flooring offers offers excellent fire safe properties. It also provides resistance to oil and grease and is suitable for use in both interior and exterior applications. This particular product is available in a selection of different grades to suit a variety of applications. We can produce our flooring products in almost any colour, subject to a minimum order quantity of 80m2.
As no two uses will be the same, we felt it was necessary to create different grades for this product. This ensures that you can get the exact safety and resistance you require, without paying for something you don’t need. Certain applications may require superior oil and grease resistance, while others may require superior anti slip properties. Our range of fire resistant flooring has a grade for any application and environment.
FLOORING GRADE OPTIONS
RCFSF-3 This particular grade offers a high degree of resistance to oil and grease deterioration. It is suitable for use in most indoor as well as outdoor applications. It also provides excellent friction resistance, which makes it perfect for high usage applications.
RCFSF-4 We created this grade specifically for use in the transport industry. It offers excellent friction resistance, which enables it to be in constant use. This grade is also comfortable underfoot while offering good hygienic properties.
RCFSF-5 This grade offers great all round properties, which makes it a highly versatile option. It can provide good fire resistant properties as well as an anti slip finish.
RCFSF-7 We supply this grade to customers who require a certified, fire safe flooring solution. This particular grade fully conforms to BS6853, DIN 5510, NFF 16-101 as well as ASTM standards. Our customers typically use this product on public transport due to the superior fire resistance it offers.
RCFSF-9 This is our Naval grade fire resistant flooring. It fully conforms to naval fire safety standards and offers outstanding fire resistance. It also offers good oils as well as other fluids.
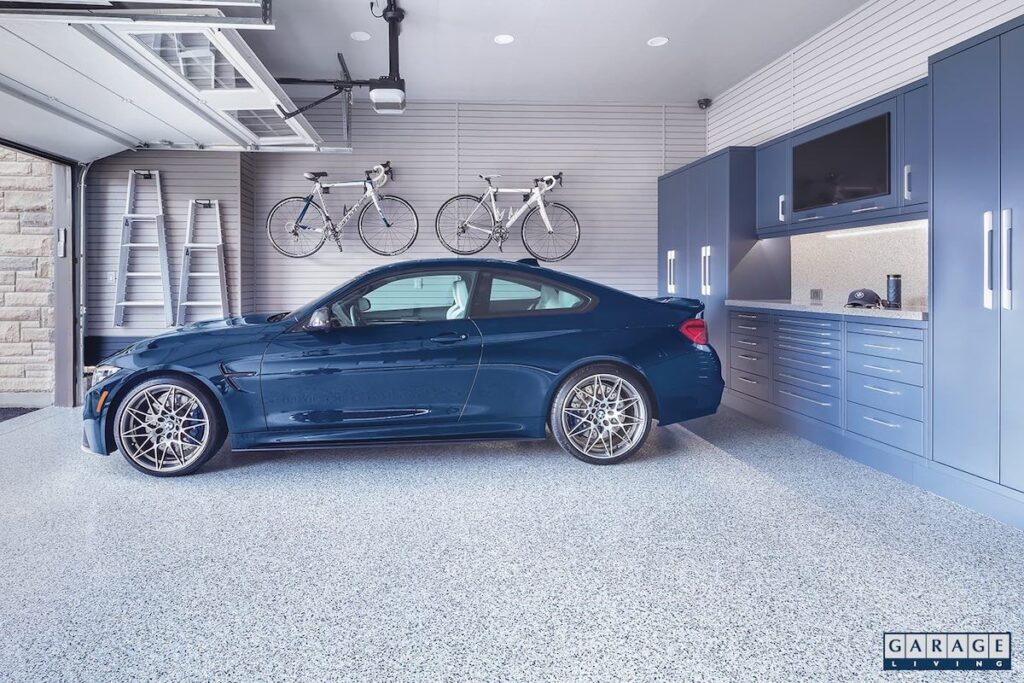
1. Polyaspartic floor coating
If we’re talking about your garage floor protection options, we may as well start with the best – a polyaspartic floor coating.
This high-performance coating is comprised of professional-grade materials that are applied by trained pros using special equipment to deliver long-lasting flooring protection.
Unlike most cheaper garage floor protection products that provide a less effective topical surface bond, polyaspartic coatings penetrate deeper into the concrete.
This creates a stronger foundational bond with the concrete that makes it more impermeable against water, chemicals, and other elements that can cause floor damage.
With its durable top coat, Garage Living’s Floortex™ polyaspartic floor coating resists damage from impacts and abrasions, chemicals, and permanent markings left on the floor from “hot tire pickup”.
Because a good floor coating doesn’t wear down as quickly as a bare concrete floor, your garage will also produce a little less dust.
And whatever dust is present from floor wear and normal, everyday use won’t even be very visible. Polyaspartic floor coatings have decorative colored flakes broadcast across the floor before the top coat is applied. This obscures dust and adds a decorative flair to your garage’s interior look.
A polyaspartic coating provides great floor protection, is easy to clean and maintain, and enhances a garage’s décor.
2. Epoxy floor coating
If you’re thinking of taking the DIY route when it comes to your garage floor protection upgrade, an epoxy floor coating kit is probably what you’ll buy.
We’ve all seen them in home improvement stores. Their box advertising promises to work wonders on your garage floor and boasts of how easy the product is to work with.
And they promise all of this at a surprisingly cheap price. Instead of being lured by a lower price tag, perhaps you should be wondering, “Hmmm…so what’s the catch?”.
The catch is that while epoxy coatings can do a serviceable job protecting your garage floor and updating the room’s décor, they fall well short of polyaspartic coatings in every measure of how the coating looks and keeps your garage floor protected.
Any epoxy coating kit’s materials will be substandard when compared to professional-grade polyaspartic coating materials.
Applying any coating product requires thorough preparation of the floor surface, properly mixed materials, and usage of the materials within a certain amount of time.
With epoxy and polyaspartic floor coatings, the temperature and humidity levels must also be taken into consideration. Unlike polyaspartic coatings, epoxies can’t be applied in extreme hot or cold temperatures.
There’s little room for error in the floor coating process, otherwise you’ll be left with a finished floor that’s visually unsatisfying and not providing you with complete garage floor protection. You’ll also need to revisit your garage flooring project for touch-ups or a complete redo sooner than you’d like.
Polyaspartic floor coatings require more expertise and specialized equipment to apply properly, which is why these projects are usually handled by professionals and cost more. Keep that in mind the next time a low-cost epoxy flooring kit catches your eye.
3. Garage floor tiles
Instead of directly upgrading your concrete floor surface, another viable option is to use interlocking floor tiles in the garage.
Floor tiles may be better suited to your floor upgrade budget. If you have floor damage that’s out of your price range to fix, floor tiles are also a cost-effective option to cover up an unattractive surface.
While floor tiles won’t actually remedy any issues with garage floor degradation, they do help minimize further surface damage from wear and tear occurring.
Floor tiles are made from plastic or stronger PVC materials for added durability when placed on your concrete floor.
Some types require adhesives and mortar to install, but look for the much-easier-to-work-with type that feature interlocking teeth.
Aside from their cost effectiveness and protective benefits, here are four other good reasons to consider interlocking floor tiles for your garage:
fast installation time
they’re versatile and can also be used in basements, laundry rooms, and storage rooms
when a tile eventually gets damaged, it’s extremely easy to replace
create a custom floor look with different tile colors and styles
4. Concrete resurfacer
One of the products that will probably show up on your radar when you’re considering different garage floor protection options are concrete resurfacers.
Concrete resurfacers are made up of a mixture of sand, Portland cement, polymer materials, and additional additives. A trowel, brush, or squeegee are typically used to apply them.
The product’s natural cement grey color can be enhanced with decorative pigments to create a more dynamic floor look.
The words “concrete resurfacer” certainly imply that this product will renew a flawed floor surface. That’s only partially true.
Intended as a more cosmetic fix for garage floors in need of a refresh, the floor protection benefits of concrete resurfacers are rather modest. This is partially because their application coat is usually fairly thin compared to an epoxy or polyaspartic coating.
Concrete resurfacers are more ideal for floors with light, superficial damage (meaning minor cracks and pitting). Bigger floor problems such as wide and deep cracks, spalling, and extensive pitting would need extensive repairs before applying a resurfacer over them.
Use CleverSeal (a unique brush based sealing system) to close the gaps around your garage door. This unique garage door seal blocks out drafts, insects, rodents, and debris. The brushes work seamlessly with the profile of your garage door to give you the perfect seal. There is a Cleverseal system for virtually any garage door type (sectional, tilt, roller). It really is a draft excluder for your garage door.
Beam Style